Descaling helps to remove calcium and other mineral deposits that can build up inside your coffee maker over time. This is more so if you use hard water for brewing.
While the mineral build-up is non-toxic, if you do not clean it frequently, it might result in your coffeemaker not brewing enough coffee, not brewing at all, or brewing weird-tasting coffee.
That is why, it is important to know how to put your Keurig in descale mode.
In this guide, I will show you how you can put different Keurig coffeemaker models in descale mode.
How to put Keurig in descale mode
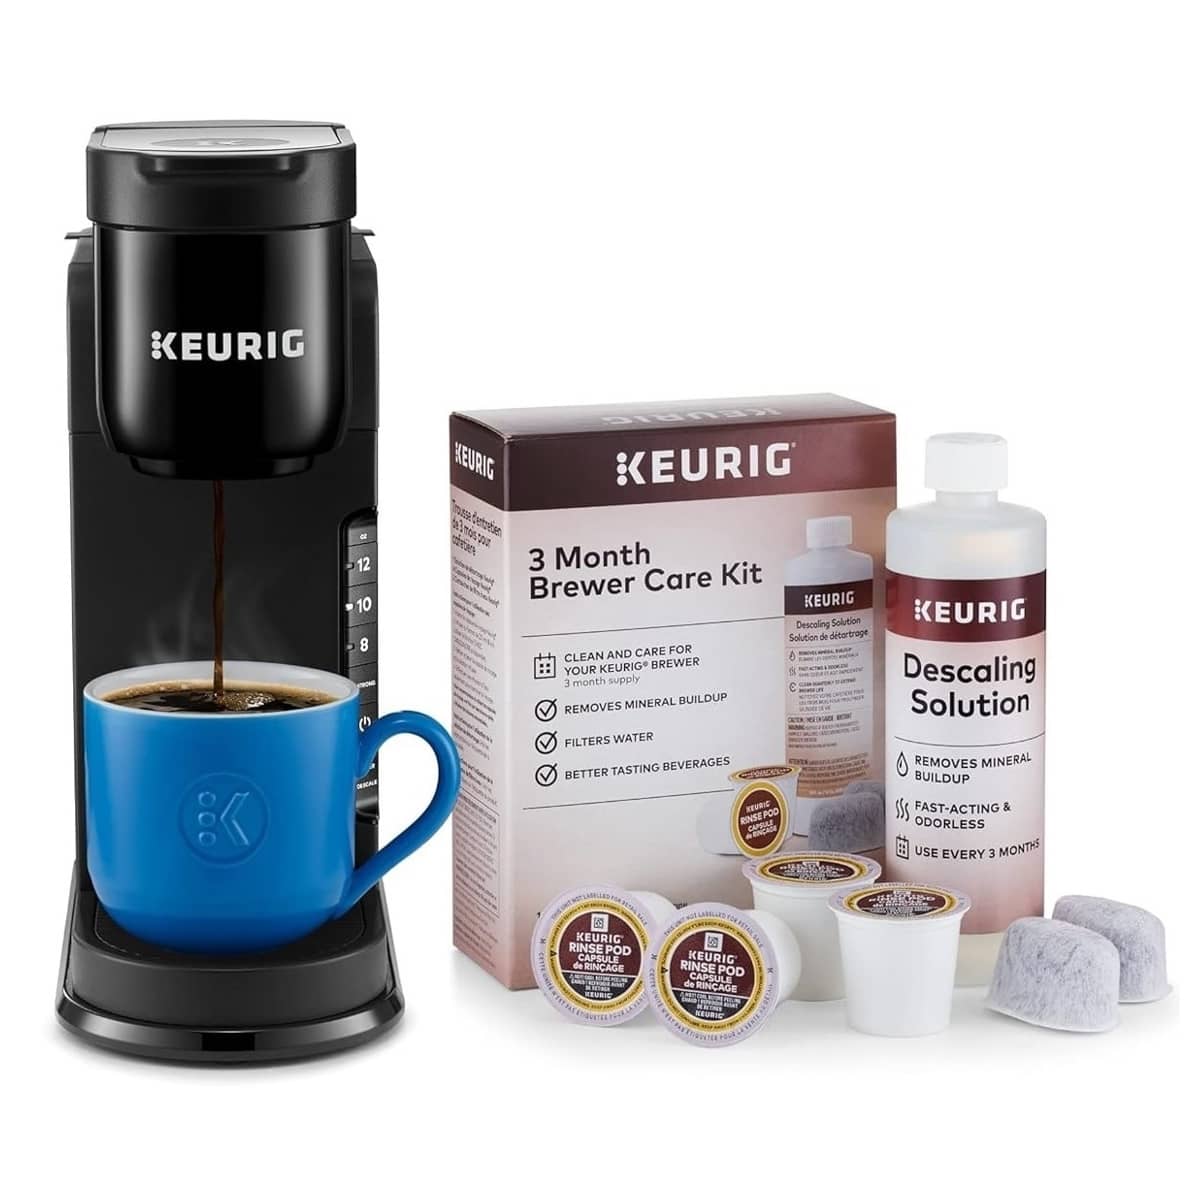
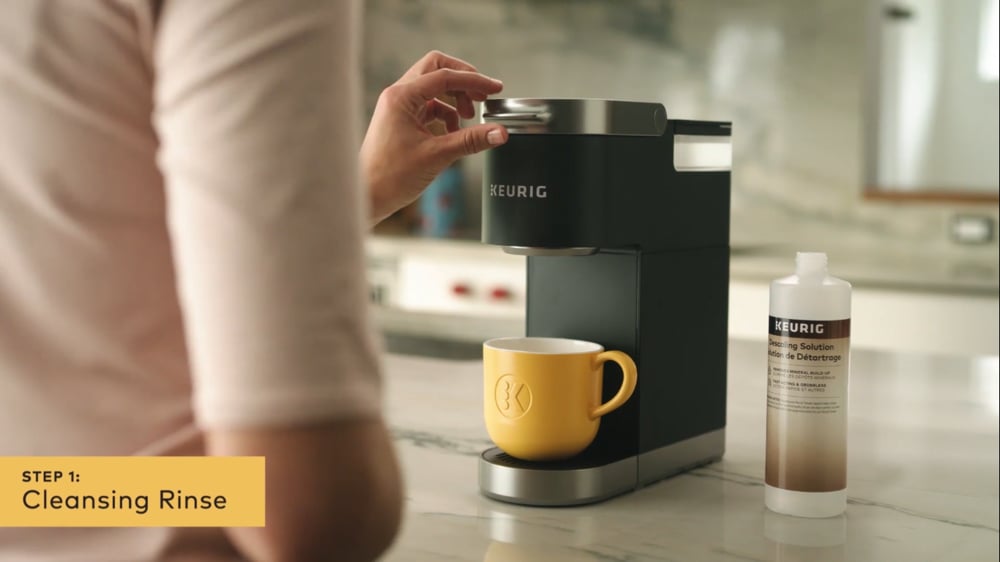
Before we start, be sure to have a Keurig Descaling® Solution with you as this is what you shall be using for descaling.
Now, since the steps vary between different models, we shall look at these steps in groups depending on the model in question.
How to descale K-Supreme®, K-Supreme Plus®, K-Slim + Iced™, K-Slim®, K-Express™, K-Iced™, and K-Iced™ Plus® coffee makers
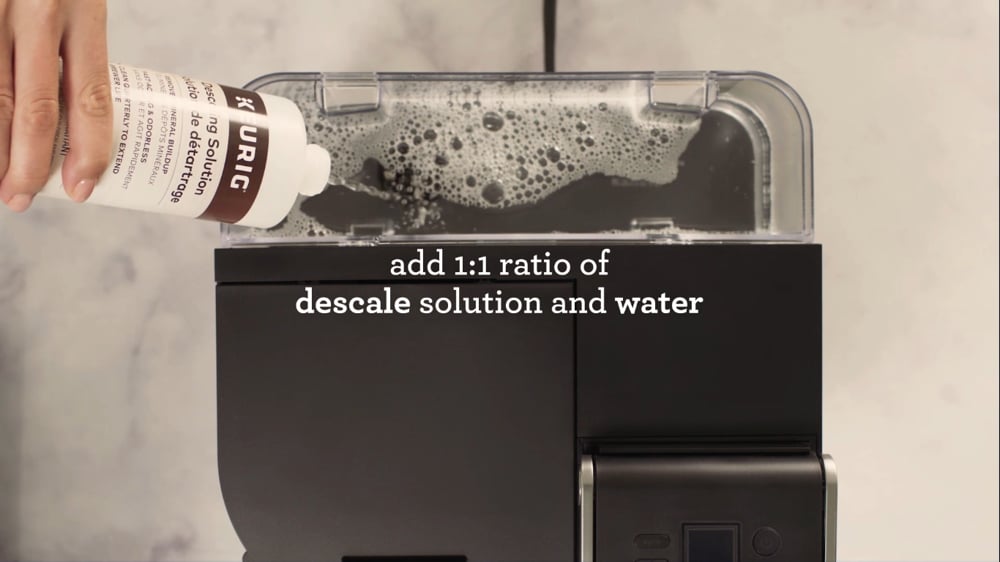
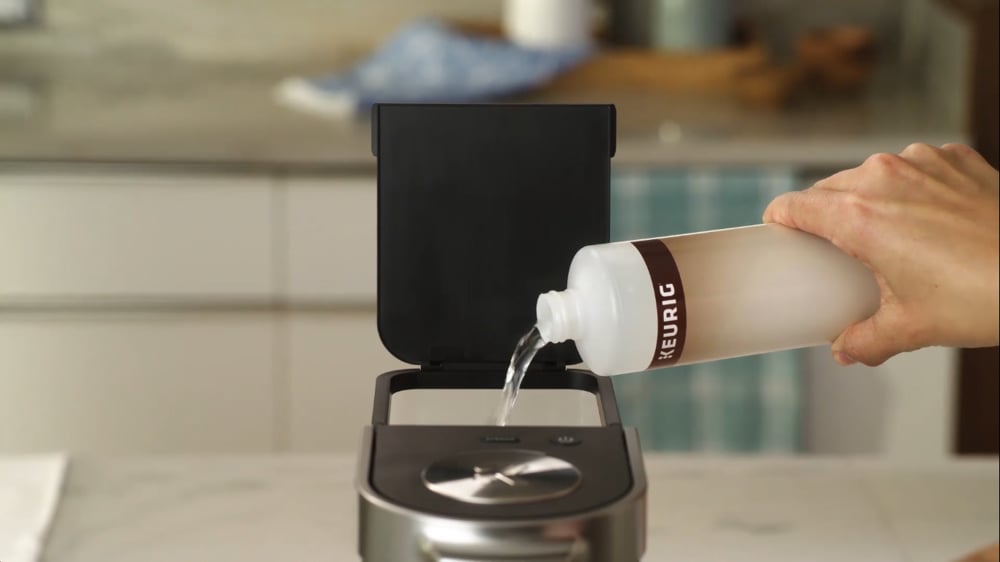
- Empty the water reservoir and then pour the entire Keurig® Descale Solution bottle into the reservoir.
- Fill the empty bottle with fresh water and pour it all into the reservoir:

Pro tip: Don’t insert a K-Cup® pod.
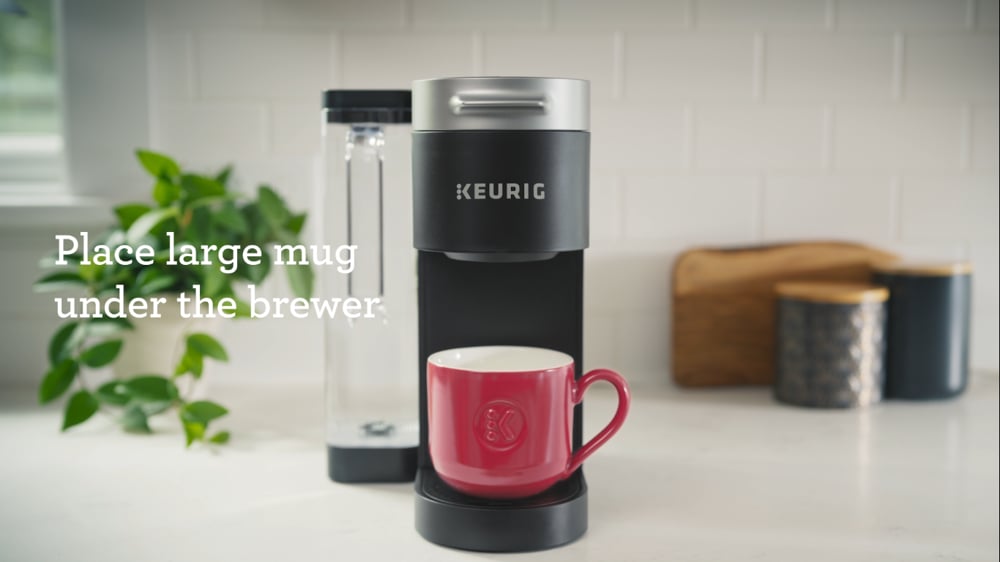
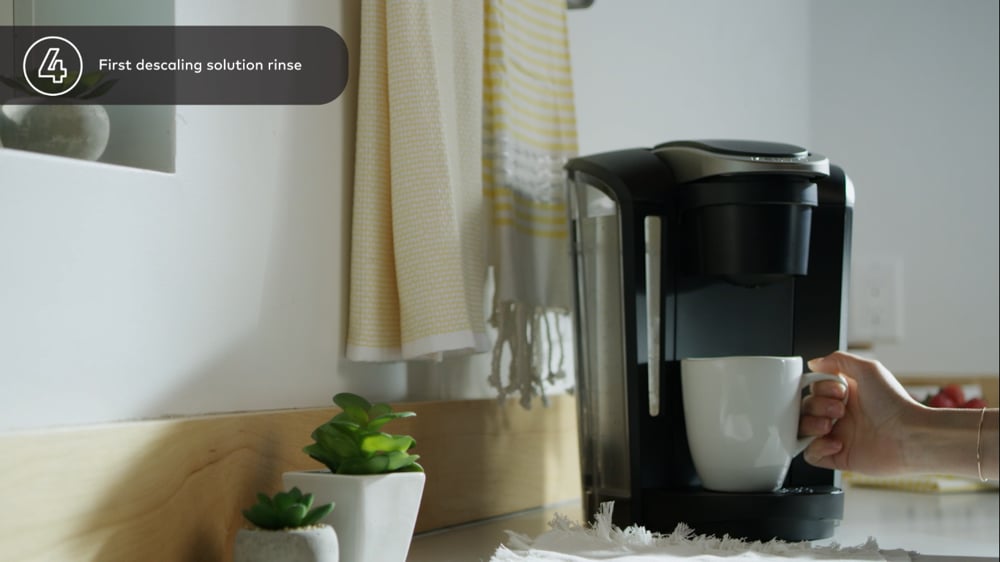
- Put a large ceramic mug on the tray (at least 12 oz):
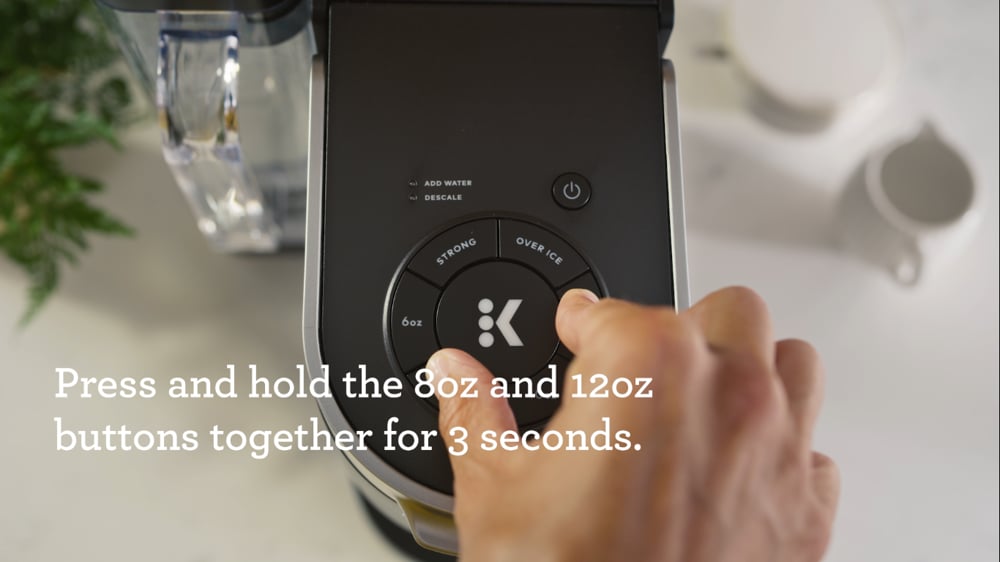
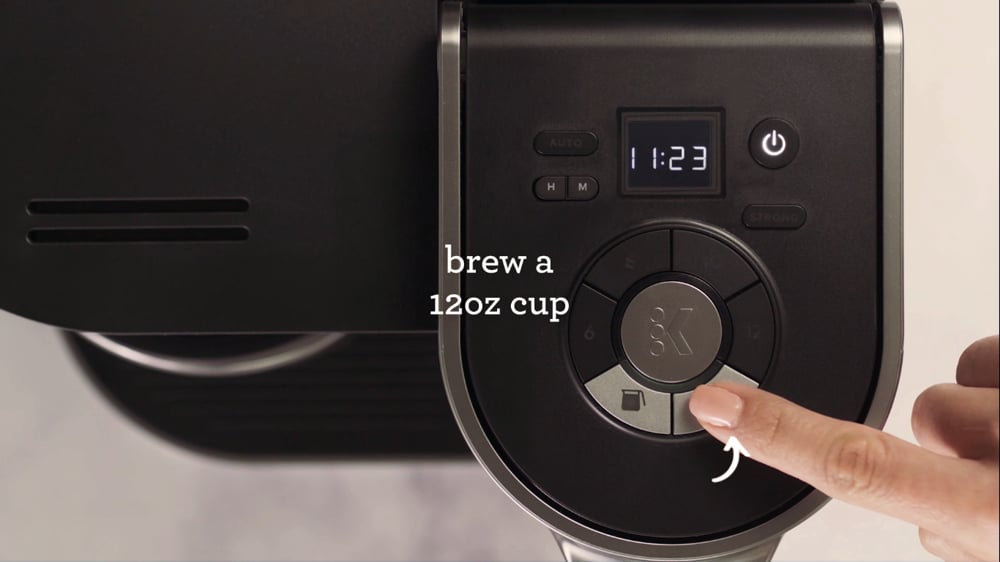
- With the Keurig plugged in but powered off, press and hold the 12 oz and 8 oz buttons for 3 seconds to activate descale mode:
Once the descale light comes on and the brew button starts to flash, press brew to start descaling.
However, on K-Express™ and K-Iced™ models, you should press the 12 oz button to start descaling.
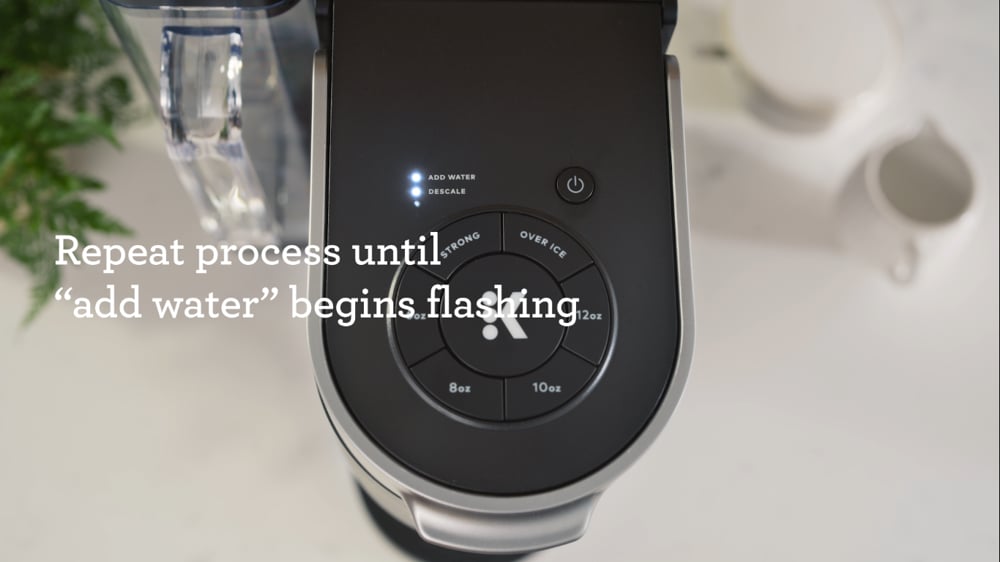
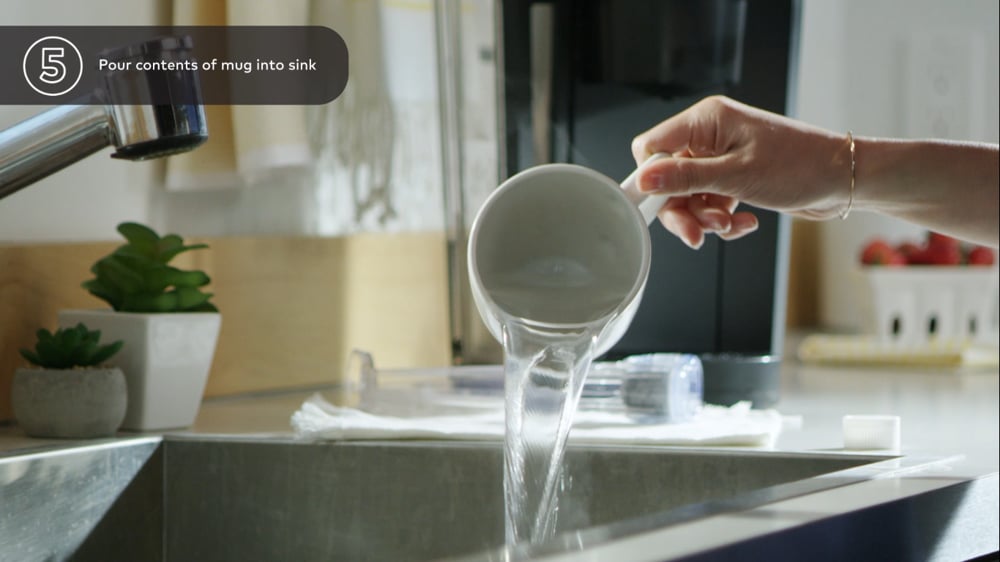
- When the brew completes, discard the mug’s content and repeat the brewing process until the ADD WATER indicator starts flashing:
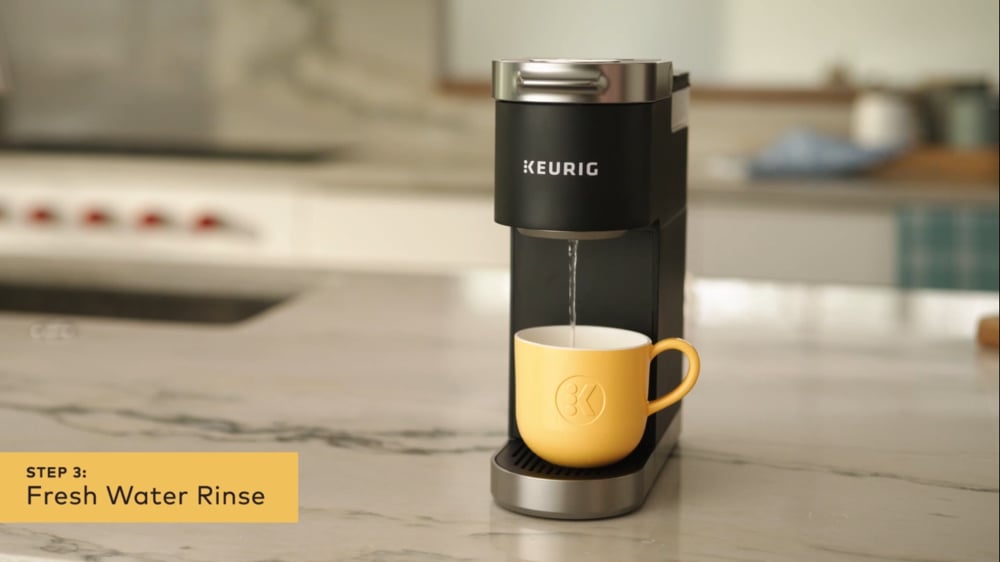
- Empty and rinse the reservoir. Now refill it with fresh water to the MAX fill line.
- To start the rinsing process, press the brew button. Remember, for K-Express™ and K-Iced™ models, you will press the 12 oz button to start brewing.
When the brew completes, discard the collected liquid and repeat until the DESCALE light turns off.
This means your coffeemaker has finished descaling and is ready for use.
How to put K-Supreme Plus® Smart, K-Supreme® Smart, and K-Café® Smart coffee makers in descale mode
If your reservoir has a water filter, start by removing the filter.
Another thing: If your brewer is displaying the descale notification, press the left arrow, choose CONTINUE, and follow the prompts to complete the descale process.
On the other hand, if you want to manually put your smart coffee maker in descale mode, here are the steps:
- Empty the drip tray.
- Press both arrows at the same time to open settings. From here, select the DESCALE MODE.
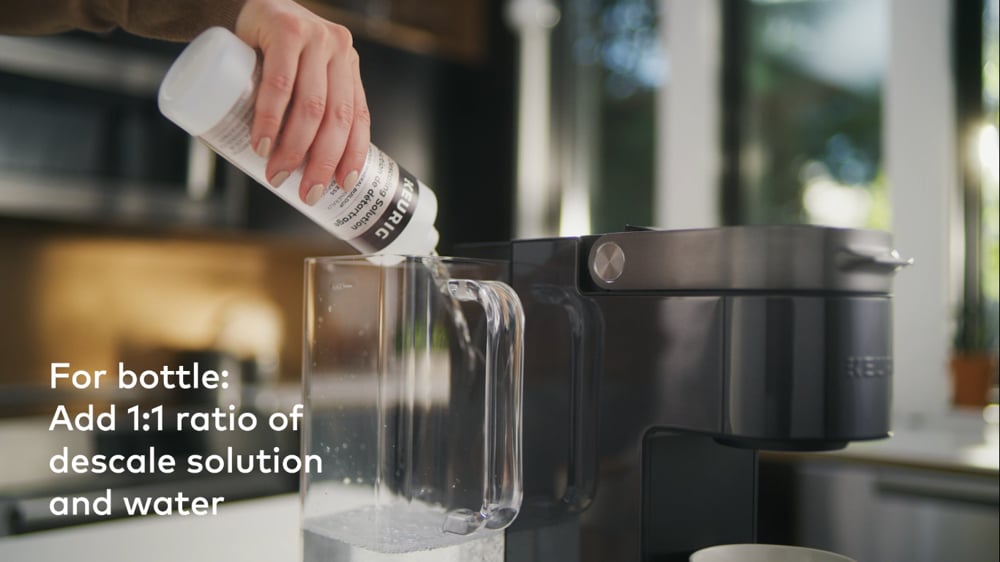
- Add the entire Keurig® Descaling Solution to the empty water reservoir. Now take the empty bottle and fill it with fresh water and also add it all to the reservoir:
- Put a large ceramic mug (at least 12 oz) on the drip tray. Press the BREW button to start dispensing hot water.
Once the mug fills, discard the water and replace the mug on the tray.
Repeat this step until the brewer says ADD WATER.
- You can now rinse and refill the reservoir with fresh water:
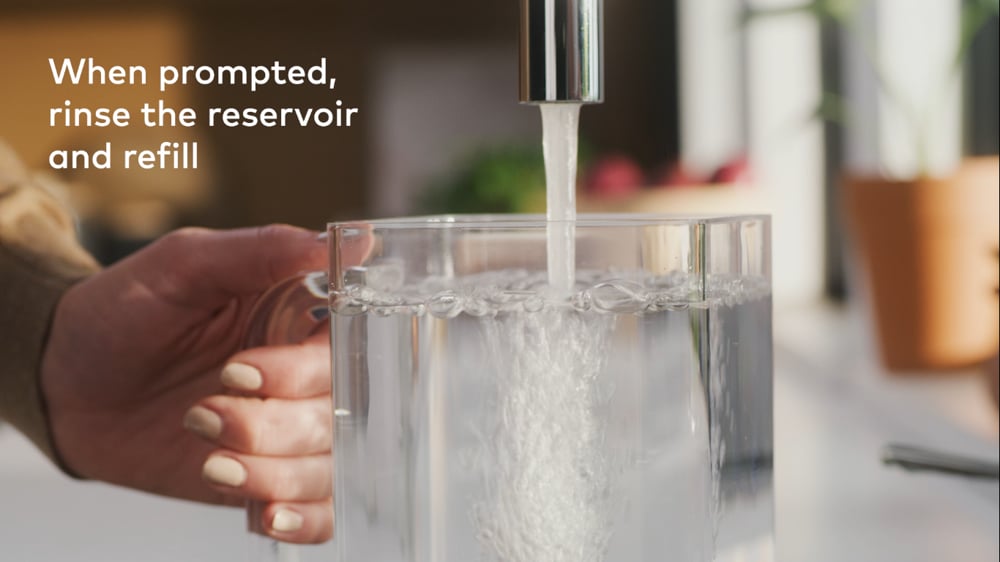
- Place the mug on the drip tray. When the BREW button flashes, press it to start the rinse cycle:

Once the brew completes, discard the collected liquid and repeat this process until the screen says DESCALE COMPLETE:
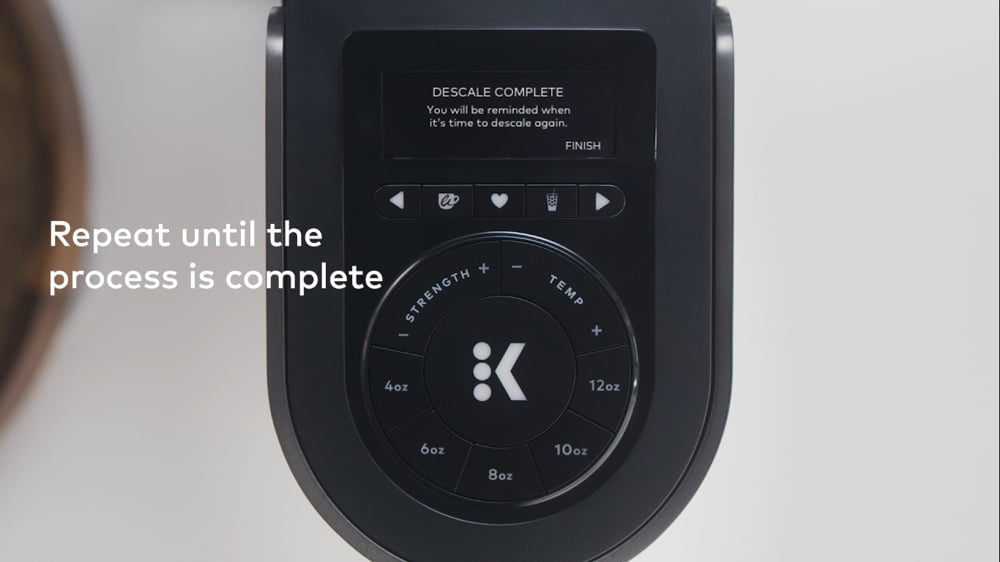
Your coffee maker is now ready for use.
How to descale K-Duo™ series models (K-Duo™, K-Duo Plus™, K-Duo™ Special Edition, and K-Duo™ Essentials)
In the K-Duo™ coffee maker series, the descaling process will take around 75 minutes.
If your model has a water filter, be sure to remove it before proceeding.
- Power off your coffee maker and pour all the Keurig® Descaling Solution into the empty water reservoir.
Now fill the empty bottle with fresh water and add it to the reservoir:
Pro tip: Don’t add any K-Cup® pods or ground coffee into the brewer.
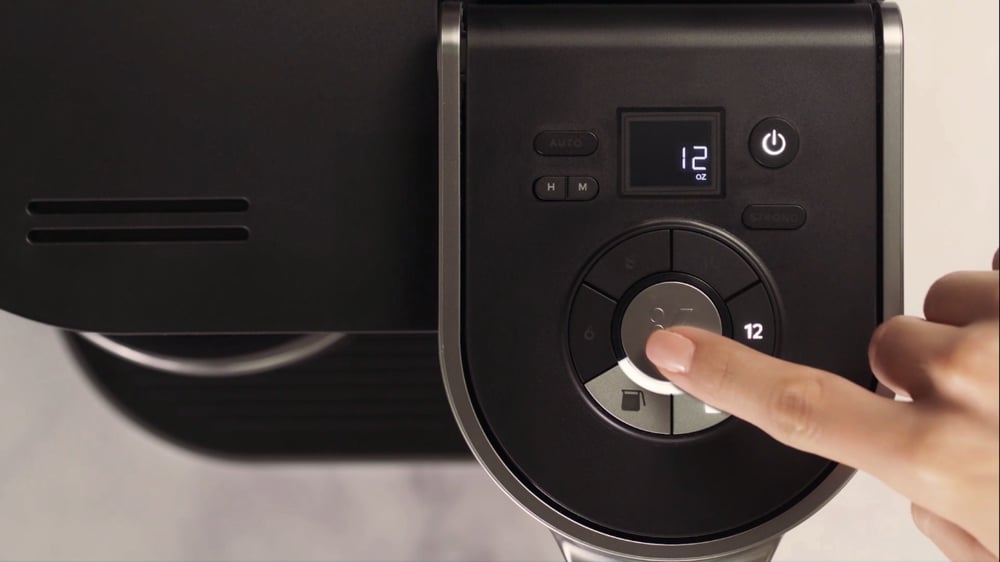
- Place a large mug on the drip tray, power on the machine, and press the OZ/POD button to turn on the single cup side:
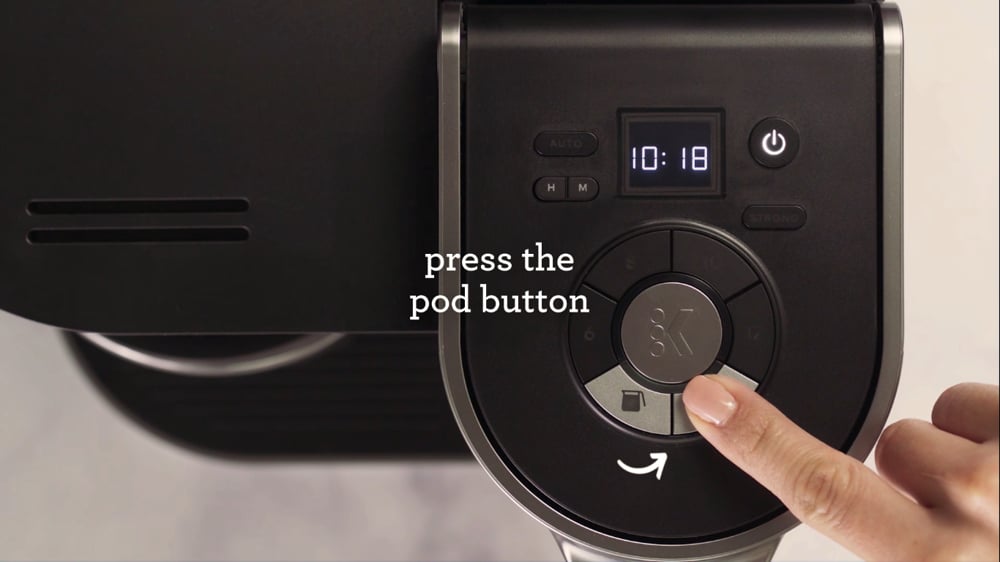
Now start the single cup rinse by pressing the 12 oz button followed by the brew button:
Once the mug fills, discard the collected mixture.
- With the carafe on the heating plate, press the CUPS/CARAFE button to turn the carafe side on:
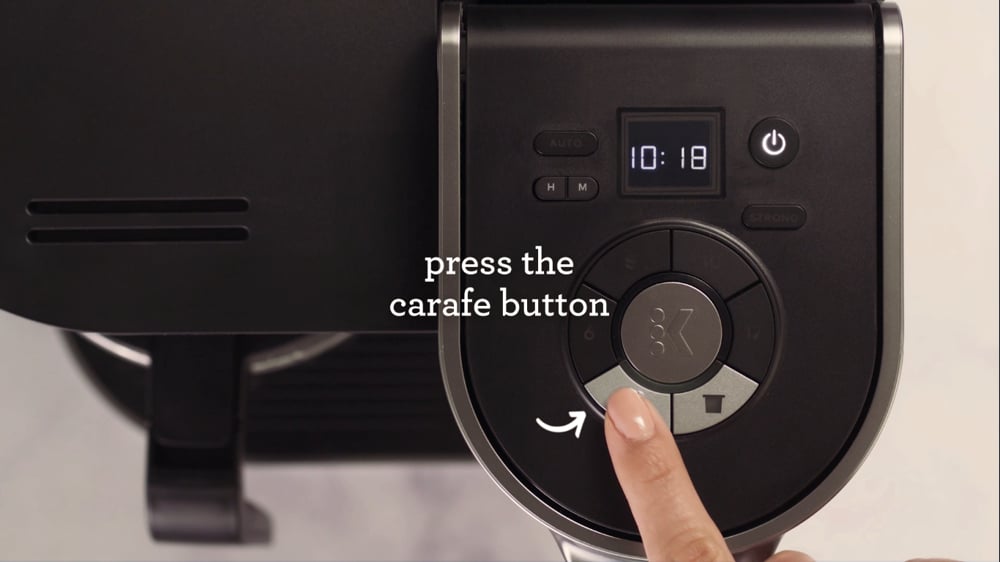
Press the 12 button to brew a 12-cup carafe and then press the brew button to start brewing.
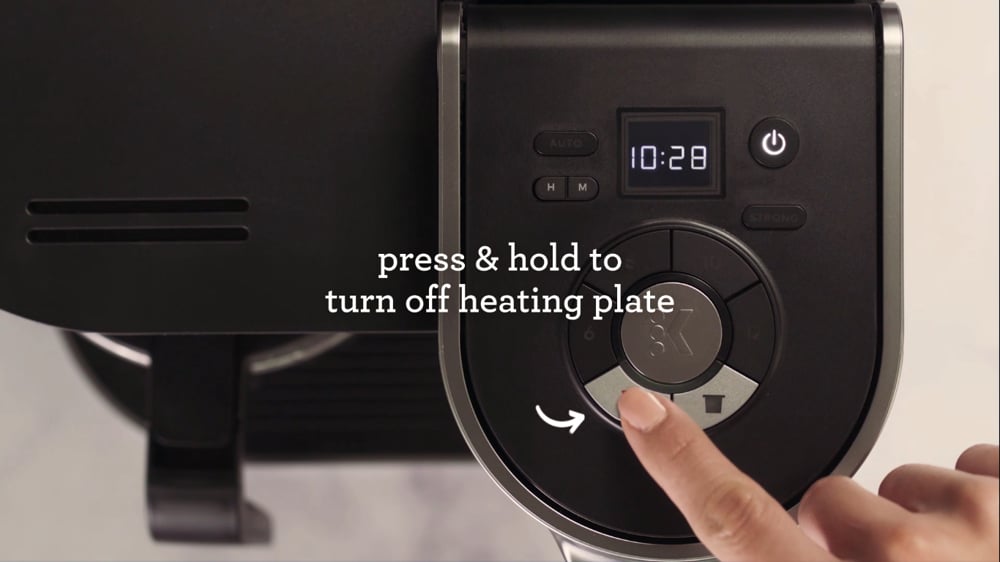
Once the brew completes, discard the collected mixture and then press and hold the CUPS/CARAFE button to turn off the heating plate:
- Let the brewer stand for at least 30 minutes to soak the internal tank.
Pro tip: Do not power it off during this stage.
- Discard any residual solution from the reservoir and thoroughly rinse both the carafe and the reservoir. Proceed to refill the reservoir with fresh water.
- Put the carafe on the heating plate and press the CUPS/CARAFE button to turn on the carafe side.
- Press 12 followed by brew to start a 12-cup brew.
- When the brew is completed, press and hold the CUPS/CARAFE to turn off the heating plate. Discard the collected liquid and fill the reservoir with fresh water.
- Repeat the 12-cup carafe rinse cycles three more times to bring the total brews to four.
- Refill the water reservoir and place a large ceramic mug on the drip tray.
- Press the OZ/POD button to turn the single cup side on. Now press 12 for a single cup brew and press brew to start the process:
Repeat this step three more times to bring the total brews to four.
How to put Keurig K-Mini® and K-Mini Plus® coffee makers into descale mode
- Turn on the brewer and add 1/3 (4.6 oz) of the descaling solution into the reservoir:
Now add fresh water to the 10 oz fill level.
- Place a large ceramic mug on the drip tray:
- Lift and lower the handle without adding a K-Cup® pod.
- Press the brew button to start descaling and dispensing. Once it dispenses, discard the contents of the mug.
Repeat this process but once the brew indicator light turns on, power off the brewer as it starts to dispense.
Let the brewer stand for at least 30 minutes.
- After 30 minutes, power on the machine, lift and lower its handle, and then press the BREW button:
- Once all the solution is dispensed, discard the mug’s content into the sink.
- Fill the reservoir with fresh water and repeat steps 1 to 8 above. Repeat these steps 2 additional times for a good rinse.
How to descale K-Classic®, K-Compact®, K-Select®, K-Elite®, K-Café®, K-Café® Special Edition, and K-Latte® brewers
- Empty the water reservoir and remove the water filter (if your coffee maker has one).
- Turn off the unit by pressing the power button.
- Empty all the descaling solution into the water reservoir, fill the empty bottle with fresh water, and pour it into the reservoir:

- Turn on the machine by pressing the power button and place a large ceramic mug on the drip tray:
- Lift the brewer handle to make sure the pod holder is empty and then lower it.
- Now select the largest brew size to run a cleansing brew.
Pro tip: If your unit has a brew button, press it to start the brew cycle.
- Once the brew cycle completes, discard the contents of the mug into a sink:
- Repeat the brewing process until the ADD WATER indicator blinks. Now, let your machine sit for 30 minutes while it is still on.
After the 30 minutes are over, pour any residual solution (in the mug and reservoir) and thoroughly rinse the reservoir.
- Fill the water reservoir with fresh water to the MAX fill line.
- Place a large ceramic mug on the drip tray and choose the largest brew size to run a brew cycle.
Pro tip: Remember not to use a K-Cup® pod.
- Discard the contents of the mug and replace the mug.
- Run at least 12 rinsing brews (using the largest brew size). In this process, you might need to refill the water reservoir.
A word on how to descale Keurig with vinegar
While Keurig Descaling Solution is fast-acting and odorless, it’s not always possible to have access to it when need be.
The good news is you can still use pure white vinegar to descale your Keurig coffee maker.
When using vinegar, you will follow the same steps as we have seen above with the following changes:
- Instead of using a mixture of Keurig descaling solution and water, you will fill the reservoir with vinegar.
- Only use pure white vinegar.
- Where the Keurig needs to sit for 30 minutes for the solution to soak, let the vinegar sit in the unit for 4 hours. This is because vinegar is not as fast-acting as the descaling solution.
- During rinsing, you might need to rinse your Keurig a couple of more times to remove the vinegar smell/taste.
How to put Keurig in descale mode – final thoughts
The cleaning action of the descaling solution might result in the brewer dispensing foam. This is normal and it should not worry you.
The descaling process will take around 45 minutes except for the K-Duo™ series models which take around 75 minutes.
As we conclude, let me remind you to descale your coffee maker at least once every three months.
ALSO READ