In this GE dishwasher troubleshooting manual, I will tell you what to do if your GE dishwasher is not working… We shall look at how to fix some of the most common problems the dishwasher might experience during its lifetime.
GE dishwasher troubleshooting manual – how you can fix various GE dishwasher problems
Since there’s no one-does-it-all solution, here are the solutions you can try for most GE dishwasher issues.
GE dishwasher not turning on / GE dishwasher won’t power on (GE dishwasher stopped working no power)
As an appliance technician, I have oftentimes found that GE dishwashers won’t come on when they are experiencing electrical problems.
That being so, here are the steps I normally follow when troubleshooting and fixing this GE dishwasher no power problem:
- I first disconnect and reconnect the power cord as it might be loose.
- Check (and reset) the circuit breaker if it has tripped.
- Use a multimeter/voltmeter to confirm the power outlet is giving around 120v AC.
If this seems to be the problem, connecting the dishwasher to another working 120v AC outlet should now have your appliance turning on.
Troubleshooting GE dishwasher not starting
When your GE dishwasher won’t start, I recommend you start by making sure that the door is closing fully.
This will involve you rearranging any dishes that might be preventing the door from closing and pushing the racks all the way in.
However, if your dishwasher still won’t close, refer to the section below on GE dishwasher won’t close for more troubleshooting steps.
On the other hand, if the door is closing fully, proceed to make sure that child lock (control lock) has not been activated.
In older GE dishwashers, you can deactivate the control lock by pressing the LOCK pad twice within three seconds.
As for newer models, you can try any of these button combinations (depending on your model):
- Press and hold the Dry Boost pad + Steam-Sani/Sanitize/Pre-Soak Sani pads together for 3 seconds.
- Press and hold the Cycle pad or the Dry/Dry Boost + Steam pads together for 3 seconds.
- In some models, you will need to press and hold the Sani-Steam button for 3 seconds.
If successful, the lock indicator light will turn off to signal that you’ve deactivated control lock.
Pro tip: Remember that for your GE dishwasher to start a cycle, you should press the Start pad within 5-10 seconds of closing the door. Otherwise, your dishwasher won’t start.
Some more fixes you can try
The other common solution you should try is deactivating DEMO mode…
To deactivate demo mode in GE dishwashers, start by disconnecting it from the power outlet and letting it sit for at least 30 seconds without power.
Once you reconnect your unit, press and hold the Start + Heated Dry/Power Dry for at least 5 seconds.
However, this will not work on all models… In some models, once you reconnect the dishwasher to the power outlet, you can deactivate demo mode by pressing and holding the Start and Delay Start buttons together for at least 5 seconds.
Finally, make sure that your dishwasher is getting water (of course it won’t start a cycle with no water).
To know how to diagnose and fix this problem, refer to the section below on GE dishwasher not filling with water.
GE dishwasher won’t close
To fix a GE dishwasher that is not closing, start by rearranging any dishes that might be preventing the door from closing fully.
Still on the same, if your model starts with ZDT, ADT, DDT, CDT, GDF, GDT, or PDT, make sure that the adjustable upper rack is in the correct position.
To be more specific, since the upper rack is adjustable 2” up or down, you want to make sure that it’s not raised or lowered on one side only.
Otherwise, the rack will not push all the way in thereby preventing the door from closing fully.
Next, check if the door has come off from one of its hinges. Of course, if it has, your solution will be to reinstall it.
Another common cause of a dishwasher door not closing that I have seen oftentimes is if the dishwasher is unlevel.
This can occur in both brand-new units and dishwashers that have been in use for some time.
That being so, make sure your dishwasher is level.
If it is not, be sure to level it using the installation and leveling instructions in the owner’s manual.
GE dishwasher not filling with water (GE dishwasher troubleshooting no water) – how to fix error code H2O in GE dishwashers
To remedy this problem, start by making sure that the water faucet is fully open.
Once done, try and straighten any kinks that the water inlet hose might have.
Next, check if the flood float is good.
To do so, remove the fine and ultra-fine filters and then lift the flood float out of the sump area.
Next, clean out any debris that might be in the sump area and make sure the flood float is straight.
However, if your flood float is damaged, installing a replacement float will probably fix the problem.
Moving on…
Remove the water inlet valve and test it for continuity – no continuity means the valve is bad.
In addition, you can measure the resistance through the valve’s terminals.
If all is good, you should get a reading of around 32 ohms.
So, if the reading you are getting is not within this range, it means the inlet valve is bad.
Here, I recommend ordering and installing a GE water inlet valve replacement part.
Pro tip: If your GE dishwasher has a turn-to-start knob, there might be a delay of up to 3 minutes before the water valve turns on and this is normal. However, if water still won’t flow into the unit after 5 minutes, chances are that the timer knob might have advanced too far and bypassed the first fill cycle.
When this is the case, here’s what you can do… Next time you are starting the dishwasher, turn the knob just enough to hear the motor start and that should be good.
Finally, if none of these are the problem, chances are that the dishwasher is not draining properly (this will stop fresh water from flowing into the dishwasher).
With that in mind, to fix this problem, refer to the solutions in the troubleshooting GE dishwasher not draining section below.
GE dishwasher not spraying water
First things first, ensure your dishwasher is getting water… If water is not flowing into the unit, refer to the immediate section above (GE dishwasher not filling with water) for steps on how to fix the problem.
Next, use a toothpick (or paper clip) to dislodge any food particles that might be stuck inside the spray arms’ jet holes.
And remember to rinse the spray arms with running water to fully remove any residual particles.
Other than that, you should confirm that no utensils are hanging down the racks in a manner that might stop the spray arms from spinning.
Pro tip: If it’s only the lower or middle spray arms that are not spraying, it’s likely the dishwasher is not getting enough water. Fortunately, you can remedy this by following the solutions in the section above (GE dishwasher not filling with water).
But before that, first make sure that the water pressure to the dishwasher is between 20 and 120 psi.
The other most common cause you should try to fix is the circulation pump assembly.
Here, start by removing any foreign objects (or clogs) that might be stuck in the pump assembly. And be sure to clean the impeller too.
Next, remove and reconnect the wire harness connector as it might have worked itself loose:
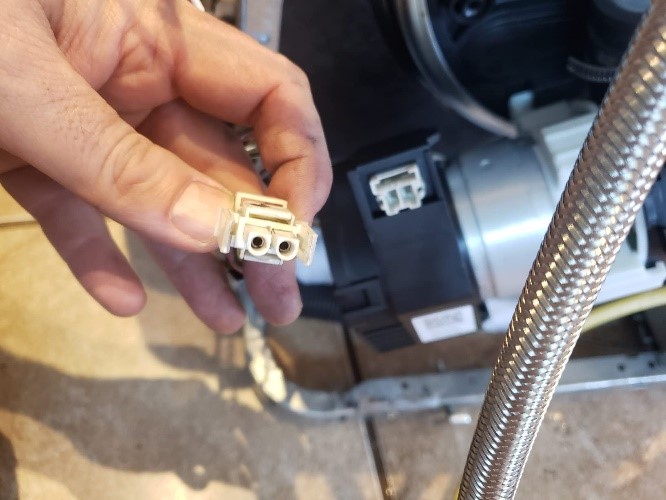
If all is good, the circulation pump assembly might be gone.
Subsequently, your best route will be to replace the assembly with a new one to get your dishwasher spraying again.
GE dishwasher troubleshooting not cleaning dishes
In such a scenario, I normally advise my clients to start by making sure that their unit is getting enough water and that it’s spraying.
Similarly, I recommend you do the same.
So, first refer to the section above on GE dishwasher not spraying water to know how you can fix the problem.
If your dishwasher is new, make sure that it’s connected to a hot water line.
In fact, GE says that most of their dishwashers cannot heat cold water so that it’s hot enough to clean effectively.
And while still on the water temperature, make sure that the water going to the sink is at least 120⁰F… This is the temperature needed to dissolve the detergent and loosen the food soils.
Next, ensure that the water pressure to your dishwasher is between 20 and 120 psi.
Otherwise, your dishwasher will not fill with enough water hence the poor wash performance.
By the way, which wash cycle are you using?
You see, for your dishwasher to clean your dishes effectively, you need to select a wash cycle that suits your dishes’ soil level.
For instance, using the quick cycle will not clean heavily soiled dishes that require longer intense cycles such as the heavy cycle.
And while still on the cycle, I recommend you use the added heat options to increase the dishwasher’s water temperature.
This will make it easier for the unit to dislodge any stubborn food particles.
One more thing: If your model has a wash zone (lower rack or upper rack option), make sure you have deactivated this feature.
More solutions you should try
Confirm that the detergent you’re using is designed to be used with automatic dishwashers.
Some good dishwasher detergents that I normally recommend my clients to use include Cascade® Platinum™ ActionPacs™ and Finish® Quantum® Automatic Dishwashing Detergent.
While still on the detergent, also confirm you’re using the right amount of detergent (depends on how ‘hard’ your water is).
For soft water (0-3 grains), fill the main wash cup to 1/3 full while for medium water (4-8 grains), you should fill the main wash cup to 2/3 full.
However, if you are using hard water (9-12 grains), you should fill the main wash cup fully.
If you are using very hard water (over 12 grains), you will need to fill both the main wash cup and the pre-wash cups.
Finally, try cleaning the fine and ultra-fine filters.
Pro tip: You should frequently clean these filters (at least once a month) to ensure a good wash performance.
Troubleshooting GE dishwasher not draining – how to fix FTD, C1, C3, and F56 codes on GE dishwasher
If you can hear the drain pump running, start by straightening any twists that might be on the drain hose.
And while still on the hose, be sure to remove any clogs that it might be having.
Next, remove and clean both the fine and ultra-fine filters as they might be clogged.
Once done, proceed to clean any clogs that might be in the air gap and garbage disposal.
One more thing: If you have recently installed the dishwasher, ensure that the maximum height of the drain hose does not exceed 72” if you’re using an air gap as follows:
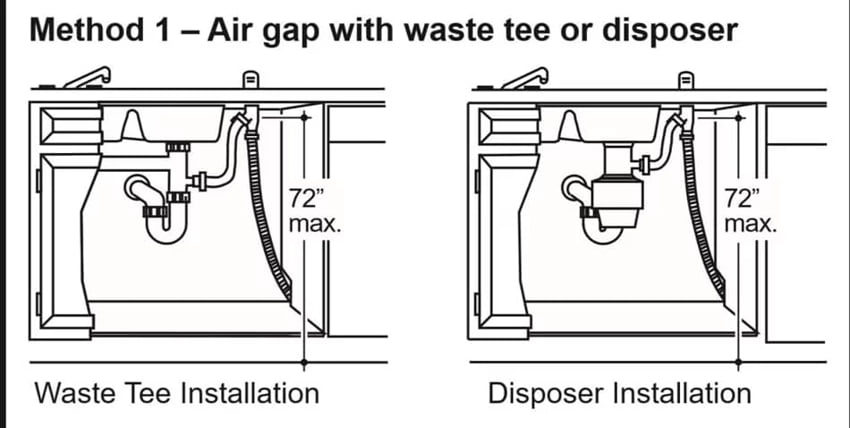
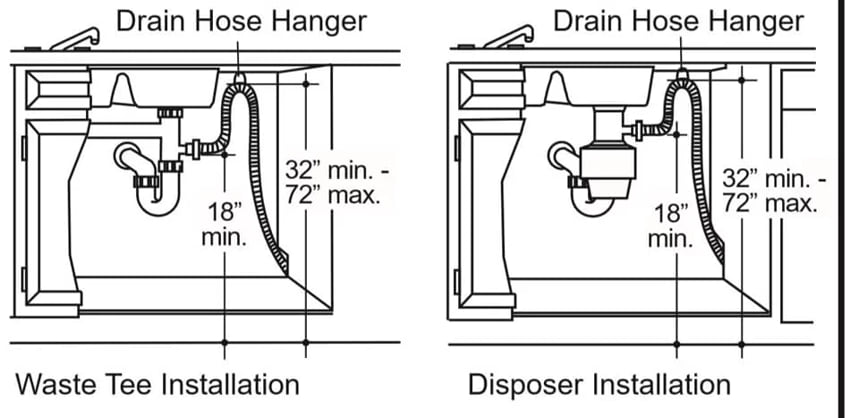
And the same maximum height applies even for high drain loops as here:
One more thing: If you have recently installed/replaced the disposer, confirm that you removed its drain plug.
Next, remove the pressure sensor (you can find it behind the toe plate as below):

Once you remove the sensor, use a paper clip to remove any clogs that might be in there.
You might also consider separating the black and white part to ensure a more thorough clean.
Next, rinse the sensor under running water to remove any residue that might be remaining in there.
If the sensor is too dirty to clean (or it appears to be faulty), you can easily purchase a new sensor and swap it with the faulty one.
More solutions you should try
On the other hand, if your GE dishwasher won’t drain and you can’t hear the drain pump running, start by checking (and cleaning) the pump for clogs.
If the pump assembly is clean, disassemble it to access the pump motor terminals and test them for continuity.
If they do not have continuity, it means the pump motor is bad. Here, your best bet will be replacing it with a quality new pump assembly.
Another test you can perform is a resistance test across the pump motor terminals.
If the pump is good, it will have a reading of 27 ± 2.7 ohms.
So, if the reading you are getting is out of this range, it means your drain pump is faulty.
Consequently, you should consider replacing it (view current drain pump assembly prices).
On the other hand, if the drain pump is good, try disconnecting and reconnecting its wire harness. At times, this will fix the no drainage problem if the wire connection was loose.
Now, if all the above checks out and the pump still won’t kick on, it’s likely that the control board is bad.
Unfortunately, when it comes to a bad control board, your only workaround is to get a new board.
GE dishwasher stops mid-cycle (GE dishwasher stops after a few minutes)
For the most part, your GE dishwasher will stop after a few minutes of running if it cannot drain.
That being so, start by checking for drainage problems – follow the steps in the section above (troubleshooting GE dishwasher not draining).
Other than that, your dishwasher will stop in the middle of a cycle if it’s not getting any water.
To know how to troubleshoot and fix this problem, refer to the previous section above on how to fix GE dishwasher not filling with water problems.
When the dishwasher stops, is the door slightly ajar?
If yes, it means that the door is not latching fully.
Here, I recommend trying to close the door a little bit more firmly.
If the problem persists, it’s possible the latch is going out and you might need to order a new one.
Finally, if the problem persists, take out the pressure sensor and use a straightened paper clip (or toothpick) to remove any gunk that might be trapped inside the sensor.
Also, you might consider disassembling the pressure sensor to make sure you are removing all the clogs.
Remember, if your pressure sensor is too dirty to clean (or appears to be faulty), you can always replace it – view current pressure sensor prices.
GE dishwasher not heating
To fix a GE dishwasher that won’t heat, start by locating the high-limit switch.
If your switch has a small button, gently push it – this will reset the switch if it has tripped.
If this does not work, take out the switch and test it for continuity – no continuity means the switch is bad hence you need a new one.
Next, check the heating element for possible signs of damage such as burn marks or cracks.
Alternatively, you can measure the resistance through the element’s terminals.
If the element is good, you should get a resistance reading that is between 10 and 30 ohms.
Fortunately, if your heating element is bad, you can easily buy a quality heating element to replace it with.
GE dishwasher not drying
If your GE dishwasher won’t dry, start by making sure that it’s heating. For this, you can refer to the above section (GE dishwasher not heating) for troubleshooting steps.
Also, your GE dishwasher might stop drying if the rinse aid dispenser is empty.
So, be sure to refill it with a good rinse aid such as the Jet-Dry® rinse aid.
Moving on…
If your dishwasher has a venting system, be sure to remove any foreign objects that might be restricting the airflow.
And if you note that the vent isn’t opening at all, you might need to replace it.
Some tips and tricks you can use to improve your dishwasher’s drying performance
- Choose the Heated Dry (or Power Dry) options when running a cycle.
- If you don’t want to use the heated/power dry option, you can slightly open the dishwasher door once it finishes a wash cycle. This will allow the warm moist air to escape the dishwasher.
- Avoid overpacking your dishwasher to ensure there is enough space between the utensils. This will allow for proper air circulation during the drying process.
- Finally, when packing your dishes, slightly slant them to prevent water from collecting on the dishes.
GE dishwasher won’t stop beeping
If your dishwasher is beeping every 30 seconds (or every minute), it means the door has been opened during a cycle.
In this case, closing the door will stop the beeping.
However, if the beeping continues, your dishwasher might be experiencing a power failure problem.
To remedy this, turn off the circuit breaker line to the dishwasher and let the dishwasher sit for at least 1 minute without power.
GE dishwasher troubleshooting blinking lights
If it’s the Start or Start/Reset lights that are blinking, it means your dishwasher has been reset and it’s currently turning off.
This indicator will continue blinking for around 75 to 90 seconds before it stops and this is normal.
However, if the blinking continues (or other indicator lights are blinking), the dishwasher might be having power problems due to a power failure.
The good news is that you can quickly fix this problem by resetting your dishwasher. To do so, do one of these:
- Press the Start/Reset button and leave the dishwasher for 2 minutes for it to reset.
- Turn off the circuit breaker and let the dishwasher stay for at least 1 minute without power.
GE dishwasher stopped beeping
On some GE dishwasher models, you can turn the beeping on and off by pressing the Heated Dry or Power Dry pad 5 times in a row quickly.
However, in a few select models (those that have an LCD), you will need to press the Heated Dry or Power Dry pad 7 times within 5 seconds.
Final thoughts on GE dishwasher troubleshooting manual
As I wrap it up, let me mention that if you’re not that handy in DIY repairs, worry not… You can find an easy-to-follow video on YouTube to guide you along as you fix your unit.
PREVIOUS QUESTIONS
Why is my dishwasher still wet inside?
Why are my cascade pods not dissolving?
What causes a dishwasher to leak out the front?
What are the telltale symptoms of a bad dishwasher water inlet valve?